Article on The Internet Mini Encyclopædia |
Header
SSI Insert revised (no index tag!): 22-Feb-2016
Article on The Internet Mini Encyclopædia |
Rear subframe Bolts
If you are removing the rear subframe and despite the use of heat, release fluid, and prayer still managed to break off one of the front mounting bolts or shear a captive nut, here are 2+ possible ways to get around replacing the mounting panel
Nb: too keep the bolts "undo-able" When refitting use loads of copperslip grease on bolts and in holes. Peter Kay suggests the removal and re-coppaslipping of the 4 front bolts at each service
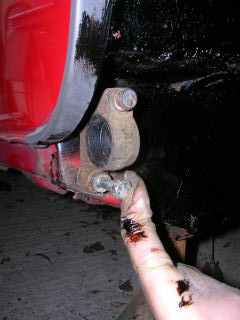
#1 VERY LONG SHOT: Simon Dummett (the other half of IME) suggests it is possible ON SOME CARS to access the rear of the mounting plate ( shown in (1) below) on the end of the sill THROUGH the back of the companion/map pocket, thus you can place a NON captive nut on the end of the subframe mounting bolt. Seemingly enough on some cars the sill aperture is OPEN in the companion pocket and the panel you see is the OUTER Sill. Drill out the sheared off bolt or nut to allow a possibly longer bolt through.
Andy Hayward seems to recall seeing a Belgian Car so equipped
#2 Paul suggests an alternative approach to the job below is to cut an access hole in the sill to reweld a captive nut in place once the subframe is fitted, however this damages the smooth lines of what might be an intact sill, the process below deals with an area HIDDEN once the subframe is refitted
#3 The process of grafting a new captive nut on to the mounting plate is described here:
|
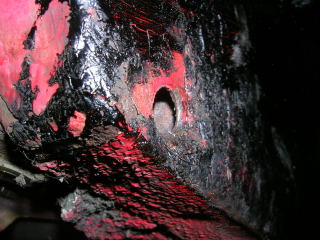
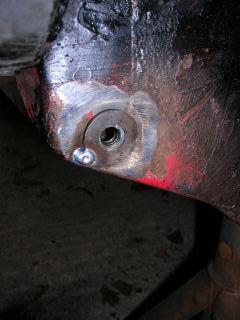
1) You will need to remove the remains of the sheared bolt in the existing captive nut, in an attempt to centre-punch and drill out this from Colin Suttons' daughters car, "Poppy," the captive nut sheared away from the panel on its holding plate, you can see it through the hole! THEN DRILL OUT the captive nut hole to approximately half the diameter of the NUT used below |
 |
|
|
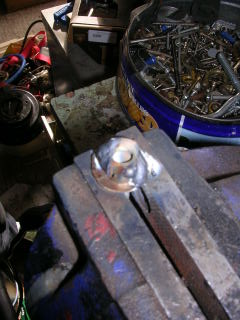
2) Find a suitable nut (same thread as the subframe bolt) and thick washer, prepare both with a grinder to remove rust and/or electroplating from the contact faces and edges visible, have a sacrificial bolt in place to hold the washer and nut in register Weld around the nut to securely fasten it to the washer Clean off the weld with a grinder to leave a smooth fillet weld |
|
3) You might wish to prepare a SACRIFICIAL Washer/Nut/bolt combination for this part of the work TAKE CARE, you will need a good thread later on as this will be used for the SUBFRAME MOUNTING!!! With the washer/nut assembly held in register with the subframe mount bracket, using another sacrificial bolt "gently" hammer the bolt head to make an impression of the contact patch of the nut/weld on the mounting panel so the washer will be FLUSH with it.
|
 |
 |
4) The impression of the nut/washer in the end panel NOTICE it is very good alignment as the subframe mount bracket has kept it in register |
|
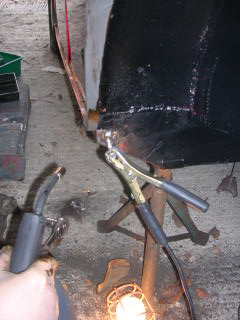
5) IF YOU HAVE PREPARED A GOOD WASHER/NUT pair, swap over to it now Tack the nut/washer in place held in register as in Picture 3,with your MIG Use the sacrificial bolt as the EARTH for your M.I.G. You might wish to hammer the washer in flat at this point before it is secured 100% Note the nice groove to weld into!!! |
 |
 |
6) Finish off the job, weld the washer in properly! |
| 7) The completed weld | 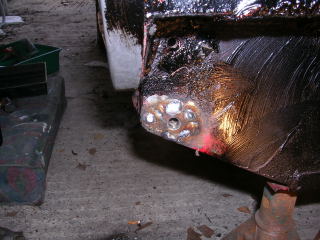 |
 |
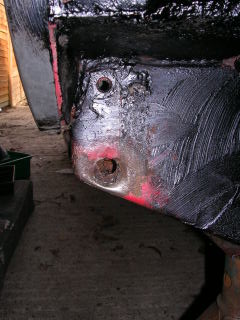
8) The job ground flat, looks good if not PRACTICAL CHECK THE THREAD IS GOOD! |
| With the surface primered and undersealed the subfram, supported with two jacks, is placed in position (two man job) and secured... JOB DONE | 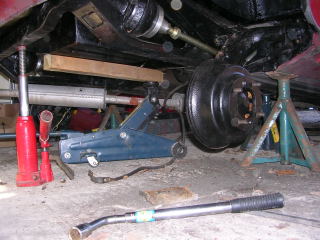 |
Added by FB & Flying Pig after a day at Flying Pig Pits 18th March 2005